

16 July 2003
Top section is showing some rust blooms. Understandable because this is the only part of this tower that was not primed before putting
on epoxy paint. Rest of the coating on the tower proper looks good all the way to the bottom. In the future we need to
loosen the cable bundles on the legs and coat there also.
The boom truss wires for the 20 and 15 yagis rest on zig-zags. There is some rust and abrasion damage there -- I
scraped them clean and taped with many layers of Scotch 33. This is a good interim fix.
The wire clip trios that hold the boom truss wires and the boom wind guys are rusting. Some
of these have already been sealed, but the rest need wire-brushed, and sealed in duct seal and then coated with
Scotch 33 to arrest the corrosion. At some point these need to be replaced.
Rotor, top plate, rotor plates, bearings, and 40 yagi all look good.
Center insulator on the SA yagi is a fiberglass rod, which is starting to melt away. The
resin evaporates and then the glass thread is exposed. Needs coated with Scotchkote.
One element strap on the SA yagi is badly corroded, but luckily it is within reach on
the driven element. All else looks good.
10 meter yagi looks 100% good. This is N8LGP's workmanship shining through.
15 March 2005
Stone guy: coated EP and guy anchors. Minimal corrosion. Top two philly grips need to be replaced, bottom one needs to be coated.
Back guy: Coated EP and guy anchors. Minimal corrosion.
Wall guy: Coated EP and guy anchors. Top philly grip needs to be replaced, clean and coat the two lower ones is needed soon.
18, 19 September 2006
Installed new cradle mounts for 10 and 15 yagi. Bolt heads covered with duct seal and held in place with Scotch 33.
21 September 2006
Took down Europe 10 with help from Dana and John. Had to cut all bolts loose with grinder -- Hy-Gain fixtures were fused.
26-27 September 2006
Scraped and painted top section, down to rotor level. Very carefully scraped, filed, sandpapered all rust blooms, including removing most cables. Sprayed with cold galv and epoxied the next day. Very heavy coat. There were no significant blooms on the legs, but many zig zags had 1/16 inch deep rust that was scraped off.
29-30 September 2006
Scraped and painted 90 - 80 foot section and bottom two feet of the top section. Very aggressive, down to bare metal where possible. Extra thorough in the area of the TV antenna. Legs had a few surface rust spots, but I got them almost clean and there was no structural threat. Many very bad spots on the zigzags found and all were cleaned as well as possible. Last couple of feet on the bottom of the section had less deep rust that sanded clean easily. Noted that sections down 80 down to about 50 feet had bad blooms on the upwind zig zags. Bottom half of tower is just beginning to show blooms on upwind zig zags.
29 September 2006
Taped and spray painted the middle wall guy including encasing the egg insulator in duct seal and tape. All metal parts were previously painted with white or grey epoxy and there were no signs of rust underneath. Did a little weatherproofing on top wall guy also.
30 September 2006
Painted from rotor down to one zig zag short of the 80 foot point. Epoxy paint. Carefully covered the TV antenna, removed most tape and painted underneath. Cables need to be retaped. Top to 80 feet needs another coat as many areas were down to bare metal and just have this one coat on them now.
October 2006
Replaced EHS tail and three dead ends on top guy to Stone anchor and top guy to road anchor. Weatherproofed with epoxy, tape, and varnish. Egg insulator totally encapsulated. Wrapped two of three Philly dead ends at top in tape. Paint looked 100% good except for minor red blushes at bottom of dead end when sealed. Inspect periodically by removing some of the tape. Paint applied to some zig zags in September is bleeding rust already. Wall top guy needs to be replaced next.
November 2006
Replaced wall top guy and three dead ends. Took down yagis and replaced them after rebuilds.
7 December 2006
Replaced EHS tail and three dead ends on middle guy to the Stone anchor. Painted from top of mast down to 66 foot guy anchor. Used "Corrosion Block" (Lear Chemical Research Corporation, Mississauga, Ontario L4Y 3W3 1 800 block it sales@learchem.com ) (International number 1.905.564.0018) brought to island by N1ZZ. I scraped and sanded and Jerry followed me down, painting. Rust on zig zags on the 70 - 80 foot section was particularly bad, as well as on the left leg (southeast) just above the guy anchor. Re-painted Philly guy anchors at 66 foot point. Minor surface rust was sanded off first. Removed most cable tape and painted underneath. Also did final weatherproofing on all sidemount cradle bolts with duct seal and tape. Did NOT paint threads on any of the cradle mount U-bolts.
8 December 2006
Painted and scraped from second guy set down to bottom guy set. Jerry did both. We did NOT use Corrosion Block on this portion. This is a controlled experiment to see if it made any difference from the top down to first guy set as compared with second to bottom guy set.
Bottom guy set to ground still needs to be painted.
December 2006
WB9Z completed all scraping and painting.
February 21 2007
Replaced middle back wall guy with N8LGP. New deadends (3) and new EHS. Weatherproofed all. Varnished and reconnected 23 Feb 2007.
6 March 2007
Completed replacement of bottom back guy. Painted with ivory epoxy. Replaced all three deadends. EHS was the exact length of the piece that hung in the trees since September. Varnished with Benjamin Moore polyurethane rather than Antillean varnish. Safety wire replaced and all exposed metal wrapped in plastic this date. Complete.
3 April 2007
Inspected entire tower. 90-98 moderate rust on zig zags and a couple of legs. 80-90 Same as above and TV antenna needs paint. 70-80 same as above. 60-70 bad on zig zags. 50-60 light rust on legs -- zig zags look good. 40-50 near perfect except zz near top. 30-40 light. 20-30 light. Bottom 20 near perfect. The Corrosion Block was completely ineffective. This is probably best used on new metal prior to formation of any oxidation products.
6 April 2007
Painted all rusted spots and much of the upwind surfaces from the top down to SA yagi using about 1/3 gallon of grey epoxy. This effectively covered 95% of the exposed rust spots on the tower. This will hold the tower for about two months.
Inspection: 6 April 2007
Wall bottom guy: Moderately bad condition. Steel tail and 1/4 inch dead ends are good. 21 ft EHS as measured below on level ground.
Stone bottom guy: Fair condition. Steel tail needs replaced. 42 ft EHS as measured below on level ground.
25, 26 September 2007
Herko's crew (Casper and Maries) painted Europe tower top five sections with ivory. 6 hours labor paid for two people each day, total of 24 man hours. Follow-on inspection shows that work was acceptable. I told Herko that it would be better to use one person on tower, as two only go about 50% faster. Photos.
15 February 2008
Sections 1 and 2 painted (ivory) by N1ZZ.
22 March 2008
Painted section 5. Bad rust on rear leg at level of SA yagi. Other moderate rust an legs and zig zags. Put on heavy, careful coat of ivory. Pulled away some cables on rear leg where needed.
23 March 2008
Section 4 painted. NE (front) guy attachment point thimble is rusting. Check this soon. Coated this section heavily. Need to inspect and seal Europe tower guy attachment points next maintenance trip.
27 March 2008
Painted section 3. Nominal rust damage. Spotted all bad places from the top of tower to bottom.
July 2008
Contractors painted Europe tower grey over ivory from top down to 45 foot point. Many minor misses.
August 2008
TDS replaced feedhorn and down converter on their antenna
6 September 2008
W0CG spotted Europe tower from top down to 60 foot point. Covered all spots missed by contractors. 20 to 50 feet needs to be recoated fairly urgently.
8 December 2008
Did full inspection. 0 - 20 has very minor spots. 30, 40, 50 overdue with many rust spots, including legs. 50 - 70 good with only very minor spots. 70 - 80 Moderate touch up required. 80 - 100 Good with only very minor spots.
11-12 December 2008
Used power sander from SA yagi down to 20 feet. Found about six areas on upwind sides of legs from 40-45 in poor condition, flaking metal, most areas about 5 inches high and 1 1/4 inches wide, Scraped until only about 5% rust remained. Zig zags 30 - 40 foot section all had about 1/16 inch material loss through sanding. Sanded most to bare metal. 12 December spotted all from 20 - 45 with heavy epoxy coat.
16 December 2008
Coated from 2 feet above SA tribander down to about 17 feet. Heavy complete coat of grey epoxy.
21-22 March 2009
From 70 feet to base, power sanded and then taped anywhere with rust showing through. No bad spots on legs. Did about 8 zigzags, only two of which were blistered and giving up material. Sanded clean. On the 22nd spotted all from 70 down with heavy coat of epoxy. Added grey over epoxy on the 24th. Bottom 12 feet still needs coat of grey. It is still ivory.
25-26 March 2009
W0CG and W9JUV finished painting to the ground.
1 April 2009
Spotted with ivory bad spots from top to 70 ft. Condition was very good and only minor spots hit. No large blooms on legs.
11 July 2009
Inspected top to bottom. Top 50 is showing blooms through the spots that were spotted in April. Minor. Bottom half shows only a few rust blossoms.
17-18 October 2009
Power sanding and scraping top and Section 9. Cleaned numerous zigzags to bare, very aggressively, including removing cable in places. Taped with cheap tape. One very bad leg bloom on West leg at level of 10 meter boom. Scraped clean. Very bad zig zag on East side at 72 foot point. Applied epoxy primer to Sections 10 and 9, and bad leg and one zig zag on Section 8.
24 October 2009
Finish-coated (grey) from 40 yagi to middle of rotor body, then went down from there to bottom of Section 9, covering the primed places.
10 December 2009
Inspection: Top section perfect. From rotor body down to 60 foot point -- grey is beginning to oxidize. 60 ft to ground -- good condition of grey and only minor spots showing through. Section 70-80 in poor condition with many rust blooms. Scraped and sanded with power sander very aggressively. SE zig zag one above bottom of section near where it joins the SE leg is the worst zig zag on tower - about 30% material has been lost. Fourth zig zag up from 70 ft level back leg opposite the 10 meter boom was very bad. I peeled off tape and many layers of paint to find bad rust and loss of material. Nowhere near failure, but needs to be watched.
To do next: Epoxy on scraped areas from rotor body down to 70 foot level. After that, apply grey from rotor body down to 70 foot level. 60-70 foot section fairly urgently needs to be aggressively scraped next.
11 December 2009
Put primer epoxy on heavily on 70-80 foot section following yesterday's scraping. To do next: Grey total coat from rotor body down to 70 foot level. Scrape and sand 60-70 foot section.
24 February 2010
Inspection: 0-50 feet. Minor blossoms on zig zags and one small one on a leg. 60-70 feet. Major leg bloom at 65 feet on wall leg. 70-rotor body. All primed spots bleeding through. Need to be sanded. Rotor body - top. Minor bleed through. Mast primer good.
26 February 2010
Painted rusty spots from top to rotor body with grey, then coated everything from rotor body down to the zig zag at the bottom of the TV antenna, including the antenna itself, with grey. Dried and sanded rusty spots first. 1.75 hours on tower.
27 February 2010
Painted grey down to one zig zag above the tie point for the 80 delta loop cable (74 foot point). Dried and sanded rusty spots first. 1.75 hours on tower.
28 February 2010
Painted ivory down to 63 foot point, including middle guy point. 2.0 hours on tower.
2-3 March 2010
Found hole in wall leg at 63 ft on March 2. It was under layers of tape for the cable bundle and showing a bloom through the tape. See photo. Filed, sanded, and the next day coated with epoxy primer and then finish and put on a 30 inch splint with six pipe straps. Followed this clue and scraped paint off at numerous other locations from the top of the Heliax at the 10 meter yagi to the ground. No other holes or dangerously thin spots, but found a lot of rust. Scraped, power-sanded, and epoxied all such places.
WB9Z put three heavy finish coats of ivory on the mast. Then coated with ivory from 63 foot point down to about 55 feet, skipping zig zags in the last 10 feet. . I cleaned additional rust spots today on the wall leg which will be primed tomorrow.
4 March 2010
W0CG primed all exposed areas from yesterday, double coat of epoxy primer.
7 March 2010
W0CG painted finish ivory on all primed areas down to the SA yagi and the entire tower to one ZZ below the SA yagi. 2.25 hours on the tower.
12 March 2010
W0CG painted finish ivory from SA yagi down to, but not including, the bottom guy set at 33 feet, and then covered all primed areas to the ground. Note: The thimble at the bottom guy for the front yard guy is rusted on the bottom. Break this out and possibly replace next time.... 2.0 hours on tower.
27 March 2010
W0CG painted from bottom guy anchor down to 29 foot level. Covered very minor rust spots on some zig zags. 1.0 hour on tower.
29-30 March 2010
Installed leg splint from WB9Z at the 63 foot point. Primed on Monday and applied finish coat on Tuesday. Painted ivory finish coat down to the 16 foot point. 2.0 hours on tower each day.
9 December 2010
Dug down 4 inches on guy anchors that are in dirt. 100% good, no corrosion.
13 December 2010
Full inspection. 20-30 foot section, wall leg, 4th zz up, bad surface rust. Taped until this can be repaired. Bottom back yard guy bracket -- thimble is badly rusted and needs to be removed and replaced. Just above this guy anchor on upwind side there's severe zig-zag rust. Cleaned and taped, awaiting better repair. Bottom to middle guys is ivory, and there are a few bad zig zag rust blooms coming through. This needs only routine maintenance. At 60 foot point, need new section bolts. Brackets of TV antenna are rusting badly, may be transferring rust to legs. Take off and clean and replace. New feed-horn is not weatherproofed and hardware is rusty. Grey section from top down is nearly perfect. Took documentary photos of 40 meter antenna. Looks good. Top guy (Stone) there is rust on top of this bracket. One of four bolts on top rotor bearing is rusted, needs to be replaced. Mast appears to be perfect.
23 January 2011
Aggressively cleaned bad thimble referenced above. At least 40% of material is gone. Cleaned up well and guy dead end looks fine. Hard to tell about the bolt through the guy anchor. Also prepped rusty bolt on wall guy, bottom set. Material came off but this does not need to be replaced. Prepped bad rust area on 20-30 section, 4th zz up. Cleaned well and there's no near danger of leg penetration. 1.5 hours
24 January 2011
Continued prepping the bleeding and blistered areas from 30 - 36 feet on upwind side. No leg involvement - only zig zags. 1.75 hours
29 January 2011
More prepping: SA yagi to ground. Prepped all areas showing any blister rust.
30 January 2011
Applied epoxy primer to all prepped areas, SA yagi to bottom.
16 February 2011
Put on Signal Blue on bottom guy anchor and a few spots from there down until running out of paint. Inspect the back guy attachment point ears and thimble soon to see how the rust is progressing. Replace this thimble?
25 February 2011
Started at middle guy anchor, working down to bottom guy anchor as the next goal. Guy attachment ears are rusted on back and on the wall ears, but not on Stone side. Removed as much as 1/16 inch of material that had rusted deeply into the ears. Guys themselves look OK. Cleaned a couple of zigzags moving down. Taped for future priming. 1.75 hours
26 February 2011
Both the back and Stone legs just below the second guy set, the big parts that swage into the section below, had heavy rust. The back (toward Dirk's) leg was worse, and one of the Rohn bolts has lost almost half of its head. Both of these areas cleaned up nicely in preparation for painting. I found and prepped a couple more zig zags below that point, but neither had bad rust that propagated past the weld into the leg. Two zig zags above the bottom guy point, on the wall leg there was severe rust under where the cable tape had been, but no hole in the leg. Removed a lot of rusty material for about a foot vertically. Back of leg is clean, and I found the boundaries of the rust spot both above, below, and behind, so it is not general. There is one spot on the wall leg facing toward the house near the top of the area which is badly dimpled and I could not get all this rust off. Taped for later painting. What remains now is from middle of mid-bot guy portion of tower, down to SA yagi. 2.25 hours on tower.
28 February 2011
Cleaned more bad zig zags on 50-60 foot section. Some had very significant loss of material but cleaned up almost clear except for brown and red pitted areas. Appears that a bad run of steel was used on this section. Also found some rust on the Stone leg just above the big swage tube at the bottom of the section. but it is not deep and cleaned up OK. 1.75 hours on tower.
3 Mar 2011
Cleaned from about thee zig zags aboue SA yagi down to the antenna boom. Found several bad zig zag spots but nothing that did not clean up OK. There were brown pits in most zigzags that did not come completely clean. Looks like some poor quality material in places. The Stone leg just above the SA yagi boom was very brown and had the beginnings of blistering on the leg and a bit of material loss. Beginnings of a hole, but very innocent beginnings. Need to move SA yagi down or up and give this section of the leg a rest and a good clean and recoat.
5 Mar 2011
Applied epoxy primer to all prepped spots from 2nd guy set to ground. 2.0 hours
6 March 2011
Applied finish epoxy (Signal Blue) from mid guy set to bottom. This completes all blister repairs from mid guys to ground. 1.75 hours
29 March 2011
Sanded and prepped front leg just below SA tribander. Moderate rust and some material loss, but nowhere near a hole. Will remove antenna and prep the rest of this leg to re-mount the SA yagi. 0.5 hours on tower.
31 March 2011
Took SA tribander off leg and hung it a bit higher. Cleaned leg where antenna had been attached. Some minor pitting but no danger of a hole. Will prime tomorrow. At top, the Stone guy attachment point has lost about 1/3 of the material from the inside of the guy ear. Needs to be filled with duct seal and taped. Open up in Fall 2011 for inspection. Removed the paint from the TDS antenna brackets. One nut came off OK, but the other side broke. The specialized Channel Master U bolt is not replaceable. Consider putting on a pipe strap to hold this antenna. Inspected top half of tower. Except for minor bleed through that needs to be handled routinely in Fall 2011, all looks OK. Worst blossoms are from the second guy set up to the 10 meter yagi until reaching a height where the grey paint begins.
1 April 2011
Removed TDS antenna by cutting off the hardware and gobs and gobs of epoxy. Mounting brackets were a total loss. Removed brackets from antenna, wire-brushed, wrapped tower leg in there layers of Scotch 33, and mounted TDS antenna one zig zag higher using stainless steel pipe straps. Then cleaned leg and zig zags that had been covered by the TDS antenna and thus not properly maintained for years. Leg had one spot with about 1/16 inch loss of material that had been under the bottom TDS bracket. Zig zags above, behind, and below the TDS antenna very bad. All was scraped and taped. Lubed the hardware on the down-converter box. 3.0 hours on tower.
2 April 2011
Primed all prepped spots on Europe tower. 1.0 hours on tower, top to bottom. Next trouble spot: leg at bottom of 10 meter yagi bracket.
3 April 2011
Finish-coated all primed spots and double-coated all of the recent blue on the legs. Just below 10 yagi bracket on Stone leg was a bloom. Opened it up and it is not bad, but needs to be prepped and primed. I covered it with blue. 2.0 hours total on this and US/JA tower.
30 November, 3 December, 5 December 2011
In taking tape off when replacing the 20 Europe coax pigtail, found numerous serious areas of leg rust at the tape areas. So started at the top plate, working down, removing ALL areas of tape. At rotor level on back leg found a terrible rust blossom almost the entire height between zig zags (photo before and after). Cleaned with the Makita wire brush to reveal a slit hole in the leg. The mast will keep the structural strength and rigidity, but this needs to have a splint. On 5 December found an area almost that bad at the level of the 15 yagi, back leg, with a small leg hole and very soft grey steel at that point. Needs a splint worse then above because this leg carries all the load, as there is no mast at this level. The steel at the slit was so soft I could cut it with the utility knife. Continued removing coax tape and found bad areas on legs too numerous to mention, but all cleaned OK with the Makita. Continued very aggressive inspection from top down toward the second guy set. Finding and cleaning many zigzag blooms and some more minor leg blooms. Definitely appears that this tower will need to be decommissioned within two years, but this will require a second opinion. Found the rotor plate tabs to be extremely rusty.
6 Dec 2011
Went up with Makita and bucket of primer. Started at top and carefully removed tape from all prepped areas, re-cleaned with wire brush, and put on epoxy. Made it down to about halfway between 15 yagi and 10 yagi. 2.5 hours on tower, billed out 2.25 to PJ2T.
7 Dec 2011
Another session with Makita grinder and bucket of primer. 1.5 hours on tower. Worked from halfway between 15 and 10 yagi down to 10 yagi. Found and cleaned and primed many additional spots, none particularly major. The spot immediately below the 10 yagi bracket mentioned in the 2 April notes was not particularly bad and cleaned OK. Need to take the 10 yagi bracket off and clean and prime an area on the Stone leg behind the bottom of the LGP bracket.
8 Dec 2011
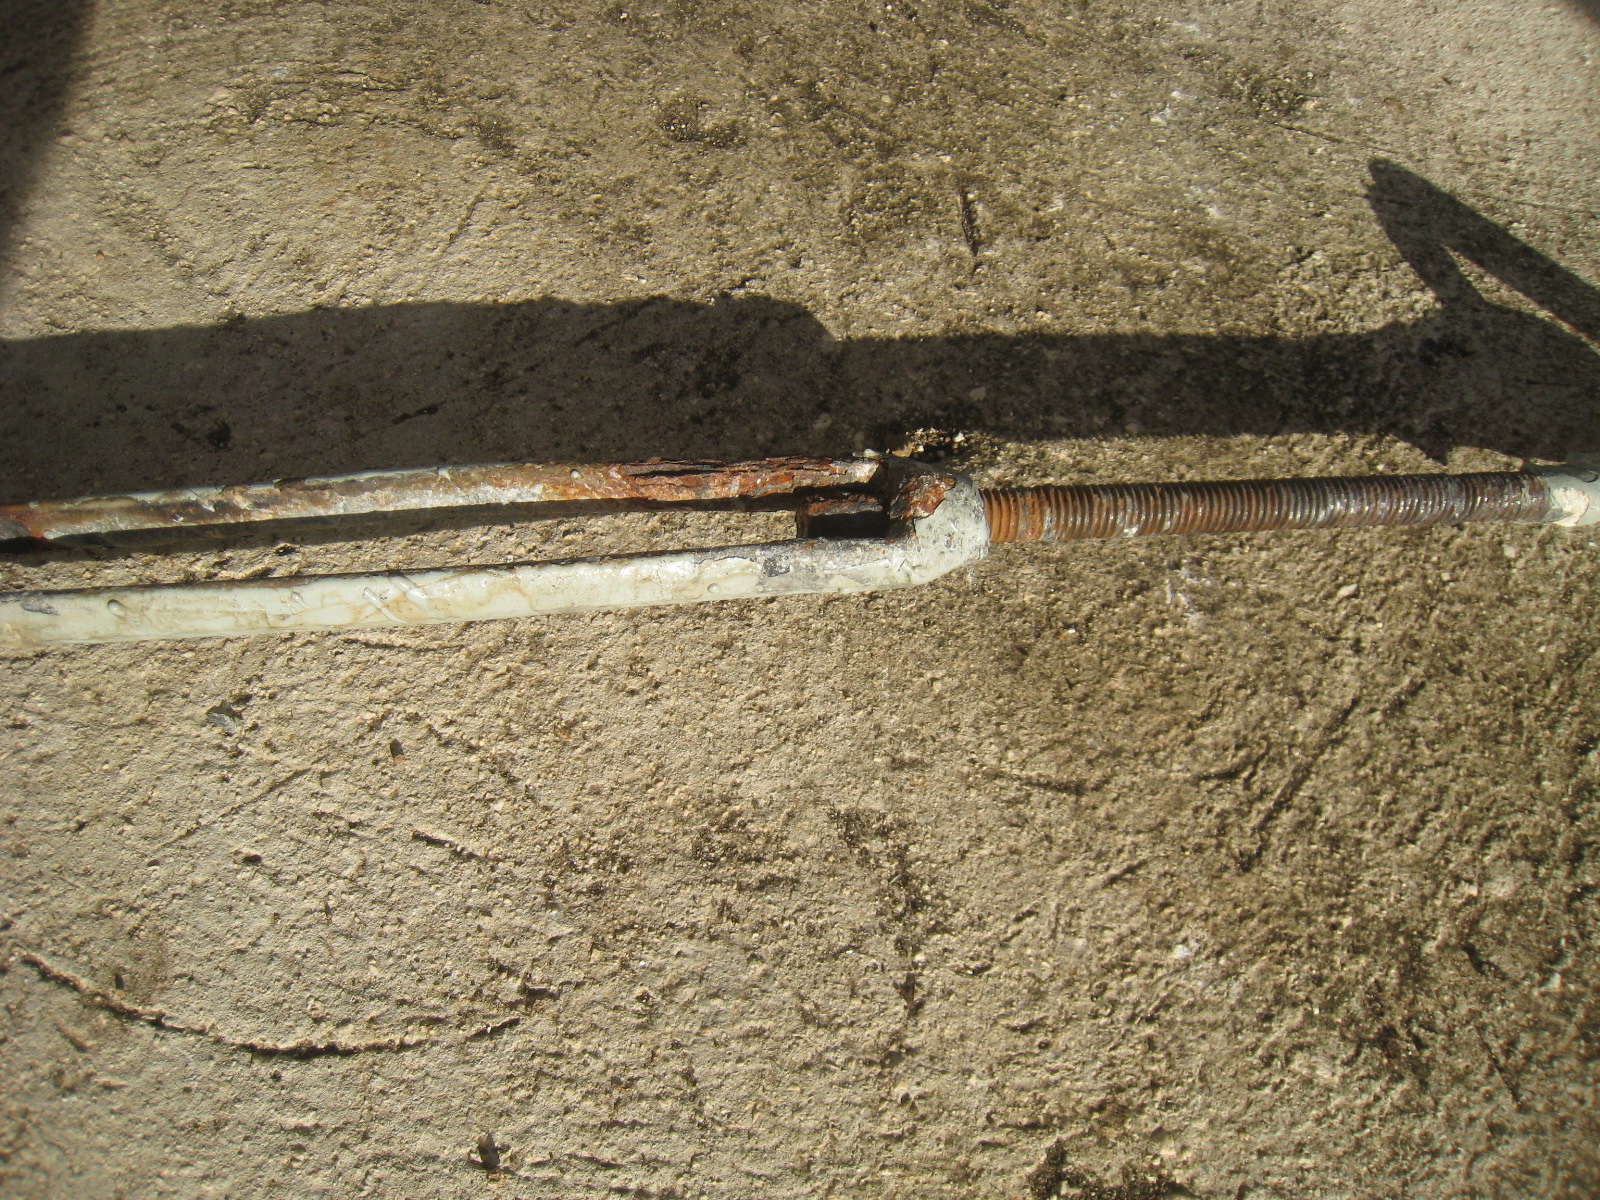
Opened guy anchor at wall to check rust and the safety guy (figure 8 wire) was almost rusted through the bottom turnbuckle and had left lots of rust there. Bottom turnbuckle was very rusty, upper threads looked about ready to let go, and one side of the turnbuckle body was semi rusted through. Removed guy, as this one has been slated for guy tail replacement for years and is the last to be done. Upper dead end at Philly-guy tail junction was good, only tiny bit of rust at the top. Cleaned this and then put on a new 1/4 deadend and primed this assembly. N4RV cleaned all threads of the other turnbuckles. Will replace this guy over the next couple of days. Then went up tower and continued working down, cleaning with the Makita and priming on the spot. 1.25 hours on tower. Only four more feet to go down and will meet the area that has been spotted in blue.
9 December 11
Put on blue to all primed spots from top down to area of the 10 meter beam, running out of blue about 10 feet short of completion. 1.5 hours on tower.
10 December 11
Sealed up the egg insulator with duct seal and tape, attached guy, removed temp guy. Primed with grinder and bucket of primer from where left off yesterday to mid guy set, and cleaned and primed other areas down from there to the SA tribander. 1.0 hour on tower.
11 December 11
Applied blue to all primed areas on tower, completing this season's maintenance. Also blue on wall bottom guy deadend and the splint saddles. 1.0 hour on tower. This completes top-down inspection and correction of rusty areas, including both coats of epoxy and the new guy wire. Will install splints tomorrow when epoxy is dry.
12 December 11
With WX0B on tower put a 45G splint on the top leg hole. Put 55G splint on rotor leg hole, but did not put on the backer pipe halves because did no have long enough bolts. Will correct this in January '12. Sprayed bolts with acrylic and covered with duct seal. Inspect these in January '12.
18 February 2012
Removed black paper wraps from back and Stone guy anchors. Top half of mid turnbuckle on Stone guy had beginnings of rust, but the turnbuckle turned OK. Put anti seize on threads and will leave the turnbuckles open to the weather so that nothing sneaks up on us. Climbed up in tree and cut out large part of the crown to clear the middle and top guy wires. Dorothy assisted.
22 February 2012
Started at bottom working to top doing aggressive inspection legs only, looking for any other undiscovered bad rust areas. From bottom to about 50 feet found only minor areas that need to be wire-brushed and then epoxied. 1.5 hours on tower. Above 50 feet to the 15 yagi found some light areas of rust on faces of legs and cleaned them by hand. Above 15 yagi there is serious but not yet structurally threatening rust around bottom rotor plate and in areas very difficult to reach because of the TV antenna.
Steps needed to preserve this tower:
1. Finish aggressive
inspection of legs, cleaning totally, and re-coating.
2. Open all nine guy point connections and deadends and inspect.
3. Open bottom splint and inspect for condition. Clean and recoat as needed.
4. Replace all three guy assemblies by moving up or down one space, one at a
time.
5. Replace bottom rotor plate and clean and recoat legs.
6. Move top rotor plate to another level and clean.
7. Remove TV antenna tape.
8. Move LGP brackets and inspect behind.
28 February 2012
Started at the top and worked to bottom, power brushing all bad leg areas discovered on 22 Feb and then coating with epoxy. Next step will be to go to top and work very carefully the same process. 3.25 hours on tower. Later in afternoon opened up all six guy attachments on ground for Stone guy and back guy. All look good and dry, and took photos that are in the Photo file for February 28. Repacked and sealed everything, then taped.
4 March 2012
Applied blue finish to all spots primed in the above paragraph. Put blue on all exposed guy parts on ground where possible.
Next steps: Aggressive rust search from TV antenna to top, then clean and coat. This will complete Step 1, above. From there, do the other six steps, with special attention to the 10 meter LGP bracket spot.
19 November 2012
Full inspection by W2GD. Grade "A." Use longer splints. Keep up present maintenance practices. "It will outlive W0CG." Other advice from W2GD: Use HD thimbles from Cargo Supply (Iowa) rather than the Rohn ones that rust easily. Cork tape from HVAC stores. Rivets wherever possible. K1TTT tech reference for Balun specs; ours are probably too many turns. For WARC twr consider Force 12 C3F12 all bands 20 and up. Put new bolts on WARC rotor. Longer splints on WARC.
25 February 2013
Started a foot about the 30 foot junction and began working down. Significant rust on back leg (cables leg) and zig zags but nothing structurally threatening. Got down to 24 foot point. Primer is on. 2.5 hours on tower.
28 February 2013
Cleaned and coated from 24 feet down to about 18. Lot of very bad zig zags. Legs in good condition. Rust is underneath but it is not breaking through the coating. 2.5 hours on tower.
5 March 2013
Cleaned and coated from 60 feet down to just above SA yagi. 2.0 hours on tower.
7 March 2013
Guy wire inspection. New guy bracket can go down one zz at bottom, up one at middle, and up one at top. Legs up one at top are in good condition to receive the bracket. Philly guy grip on back guy at top is blistering and of the nine on this tower needs to be replaced first. Installing a new guy bracket one up will require raising the 20 meter beam or grinding away part of the bottom of the LGP bracket.
8 March 2013
With help from Ulf, DL5AXX, put temp top Wall guy on. Raised Europe 20 meter yagi 3 inches to make room for replacement guy bracket assembly. Installed new blue epoxied guy bracket assembly one zig zag up from the original bracket. Extended boom wind guy on north side 3 inches and re-sealed. Wind guy on south side just fit by screwing back into turnbuckle. Re-sealed both assemblies on the ground. Coax to antenna is now 5 inches short; need to re-dress jumper to make this reach. 3.5 hours on tower in two separate trips. This was the worst looking of nine guy attachment points; thus did this one first. Had to substitute one stainless screw bolt and nut in guy bracket inner braces because supplied hardware was useless due to galvanizing on threads.
9 March 2013
Weatherproofed all hardware on new top guy bracket. Reinstalled and reconnected rerouted coax jumpers to Europe 20 yagi. Removed straps and hardware used to raise 20 meter beam. 1.0 hours on tower.
10 March 2013
Disconnected top back guy and lowered to ground. Later in day worked cleaning and epoxy primer from 48 ft down to 35 ft, with now about 5 ft remaining in the 60 to 0 foot project. Condition of bolt, nut, and guy bracket ears was good. Old Philly dead end at top was in good shape, with the rust concentrated on one side of the thimble and one side of the guy grip at the thimble. Would probably have held as much as another year. Installed new grip and thimble. Thimble had full epoxy coating before assembly to the guy grip. Breaks in tape about 6 inches down the grip were where rust was bad on the guy grip. 0.75 + 1.75 = 2.50 hours on tower.
14 March 2013
Reinstalled back guy on tower.
Had to lengthen about 10 inches on ground by installing new 1/4 inch grip.
Philly grip at tower was sealed in putty prior to installation. Opened and
inspected egg insulator. All parts 100% perfect. Added more putty and taped and
varnished with Spar 440.
15 March 2013
Removed temp guy from back top. Weatherproofed guy bracket and guy grip at top with putty and tape. Prepped Stone guy for removal. Lowered up rope for Stone guy. 1.5 hours on tower. Later that day installed temp guy on tower and attached and pre-tensioned. 0.5 hours on tower.
17 March 2013
Removed Stone top guy at tower top and lowered to ground.
18 March 2013
Cleaned and primed 35 ft to 30. Moderate rust on face of wall leg on upwind face. Removed about 1/16 material to get the blisters gone and then painted. Serious rust at bottom guy attach point, back guy; about half of zig zag gone at leg. Coated to try to slow this down. 1.75 hours on tower. Also prime back guy parts on ground and Philly grip on ground for Stone guy deadend replacement.
19 March 2013
Put on blue finish coat from 60 feet to bottom. Also coated the above ground parts. 2.25 hours on tower.
21 March 2013
Reconnected Stone guy at top on new bracket with help from Howard Stone. 0.5 hours on tower. Lengthened Stone guy at ground and reconnected and pre-tensioned. Repositioned rope for Wall guy project. Weatherproofed back guy at ground with putty.
22 March 2013
With help from Joan Price (off a cruise ship) lowered the scab guy and fully weatherproofed Stone guy attachment on new bracket. 1.0 hours on tower.
23 March 2013
Raised temp Wall guy alone with pulleys and rope and connected at top of tower. Bundled some coax on the way up. 0.5 hours on tower.
25 March 2013
Disconnected Wall guy at top of tower. Spent 1.25 hours trying to get the hardware loose with no luck. The nut and bolt were turning together. Hauled up the extension cord and grinder and cut off the guy at the top of the Philly deadend. Lowered old guy to ground myself.
26 March 2013
Put putty and tape on wall guy Philly connector and then raised it to the tower myself using a pulley. Went up tower and connected wall guy to the new bracket. 0.5 hours on tower. Connected wall guy on ground and tensioned. Bottom loop on turnbuckle had some rust, as did equalizer plate. Cleaned and epoxied that loop and reinstalled it because it is much more beefy than the new Texas Towers turnbuckles.
27 March 2013
Puttied and taped wall guy connection at top of tower, lowered temporary guy. Got off paint and loosened all six bracket bolts on the old guy bracket. Lowered one of the three bracket pieces. 1.5 hours on tower. Removed scab from wall guy and tensioned all tree new guys to get tower straight and tension of about 700 pounds in all three cables. Put safety wires on turnbuckles except for Wall, which still needs epoxy primer.
28 March 2013
Went to top and removed the rest of the guy bracket and lowered it to ground with N0KE on the pulley rope. Photographed. 0.5 hours on tower.
30 March 2013
Lubed all turnbuckle threads with anti-seize. Disconnected two of the four wind guys and untangled from new guy, then reinstalled. Both turnbuckles were perfect inside their packing.
31 March 2013
Did wire brushing and epoxy priming from top to bottom of the top section. Rust
where the old guy bracket had been was manageable. Took two trips up because the
AC power for the Makita did not work the first time. 2.0 hours on tower.
2 April 2013
Did wire brushing 90 feet down to about 79 ft, at top of 10 meter yagi bracket. Repaired leg damage, but only one spot is bad, and that is where the splint is, with the back leg splintering. 2.25 hours on tower. Extremely windy.
3 April 2013
Wire brushed and primed from 79 ft down to 60, completing all brushing and priming on this tower. 3.25 hours on tower total today.
6 April 2013
Coated with finish Signal Blue from top down to 60 foot point, completing all steps on this tower. I overcoated almost all areas of older blue from the top down to 60. These had only the most minor pinhead size dimples of rust showing through in about 1/4 of the places. The overcoat was simply to seal the cleaned up areas better and deeper. 3.0 hours on tower including extra trip to refill paint.
3 April 2014
Took measurements and photos for the mast replacement.
Bottom of mast to bottom of
bottom rotor plate: 39 in
Top of bottom bearing to bottom of top bearing: 48 in
Top of top bearing to antenna boom: 54 in.
Photos are in CurJanApr2014.
Bottom to middle guy anchor only minor rust blooming on zig-zags. Above there are a few bad blossoms on legs and where zig-zags mate to legs. Needs remedial attention.
Paint completely gone where Pacific tribander is hung.
7 April 2014
Started at top with Makita wheel and epoxy primer. Very bad spot on wall leg where the 160 rope used to be attached. If this breaks there is no mechanical redundancy. Cleaned and primed most areas. OVERPAINTED SOME BLUE RUSTY AREAS. This is the first time on either tower that I have not scraped to the bone first. Put on heavy primer at Pacific yagi. Finished all the way to bottom. Several areas have leg rust that could soon develop into holes. 3.0 hours on tower.
10 April 2014
2.33 hours on tower coating with white finish epoxy top to bottom. As above, I overcoated some spots that were not sanded down. The slow deterioration of the tower continues. It is not immediately dangerous but should be taken down in something like a three year time frame.
19 October 2014
Cleaned threads and loosened rotor clamp. Cleaned threads on three sleeve bolts on top bearing and loosened these. They withdrew 1/4 inch each fairly easily. Bearing sleeve still is fused to mast. Looks like welded corrosion between sleeve and mast. Worked hard with knife and screwdriver to try to clean some of this from te top but could only succeed to about 1/8 inch depth. Pounding on the sleeve would not free it from the mast. Try a crowbar next. At bottom bearing worked hard to clear paint from threads of the three bolts (one was never installed). Installed tower tool and still could not turn the mast an iota. Installed extension cord for the grinder on next trip up the tower. 1.75 hours on tower.
In a second 1.75 hour session on the tower today, I did these steps. Placed a 2" DXE saddle clamp 1.5 inches above the top bearing. Mostly removed the old John Thompson clamp above that point on the mast. Slobbered liquid wrench down into the mast-sleeve space on top bearing. Oiled 3 in One on the three sleevel bolts. Tried more but was unable to get the top bearing sleeve loose from the mast. At lower bearing, used the Makita wire wheel to further clean threads on bolts under the rotor plate. Was totally unable to turn any of the three nuts underneath, even with a 12" crescent wrench. Swapped in Makita grinder wheel and was able to grind the top off the first bolt. Took about 10 minutes. Bolt would still not come out because of the white gunk in the hole, but I tried the nut again and found that the heat had made it possible to get the nut off. Lots of pounding and twisting finally got the first bolt out. Did similar procedure with the other two blots and they came out. Mast now turns using the UMT sidearm leverage. Then cleaned up, lubricated all bolts, removed the UMT (hung it on side of tower) and rebolted rotor, lubricating the U bolts. Antenna now turns with the rotor but sticks going CCW at about north. Will investigate tomorrow with Uli on controls. Bottom bearing is now floating on the rotor plate. Next to do: get full rotation; try to break bottom bearing loose from mast. If successful, park it up out of the way; try with come-along to pull mast down a couple of feet; clean up and paint bad areas of mast that were in bearings; cut off bottom of mast; install new bearing under rotor plate on standoff long threaded bolts.
22 and 25 January 2015
W8WTS attempted to pull the mast down 18 inches with come-along. Nothing would budge and the bottom rotor plate was deforming. No success.
29 January 2015
Sanded with wire brush from 20 ft to ground. One bad area on a leg was found and cleaned. Overall condition is good. 1.25 hours on tower.
7 February 2015
Sanded with wire wheel from 50 ft down to 29 ft and coated with epoxy primer. About four areas on legs were serious and I removed that rust and coated. Significant material was lost. Several zig zag braces have lost half their material. 2.0 hours on tower. Next need to do 29 ft down to 20 ft. Condition of mast at top is acceptable at the bearing.
18 March 2015
Started at 64 feet, just below the first leg splice, sanding and coating. Found several leg blooms but they fixed OK. Re-primed all spots from 7 February, and did all maintenance on the 29 - 20 foot part. Ready for finish coat from 64 feet to bottom. Found serious corrosion of two of the three legs at the baseplate. Cleaned all bad metal and primed. Assured that all three weep holes are open. 3.5 hours on tower.
22 March 2015
Coated with finish epoxy, bright white, all primed areas from 65 feet to base. 2.5 hours on tower.
28 March 2015
Had extra paint after working on US/JA so started at bottom guy anchor and overcoated with white many areas down to about the 28 foot point. 0.5 hours on tower.
2 April 2015
Wire-brushed and epoxy primed from above top plate to 10 meter boom. Top section was in the worst condition. Some areas were impossible to clean and therefore I overcoated them. No showstoppers, but there is continuing deterioration throughout. 2.75 hours on tower.
3 April 2015
Finished wire brushing and epoxy primer from 10 meter boom down to Pacific tribander. Now entire tower has been triaged. 1.25 hours on tower.
4 April 2015
Applied finish white epoxy from top plate down to 10 meter boom. Rain shower happened near the end of this. Many places on the legs are showing vertical rust striations. 2.5 hours on tower.
5 April 2015
White finish epoxy from 10 meter boom down to stop point. Both towers complete for the season. 1.5 hours on tower. Re-drilled the three weep holes at base to be sure they were open.
12 December 2015
Noticed that Phillystran-EHS transition guy grip on middle wall guy is corroded and preparing to let go. Must repair in February.
18 February 2016
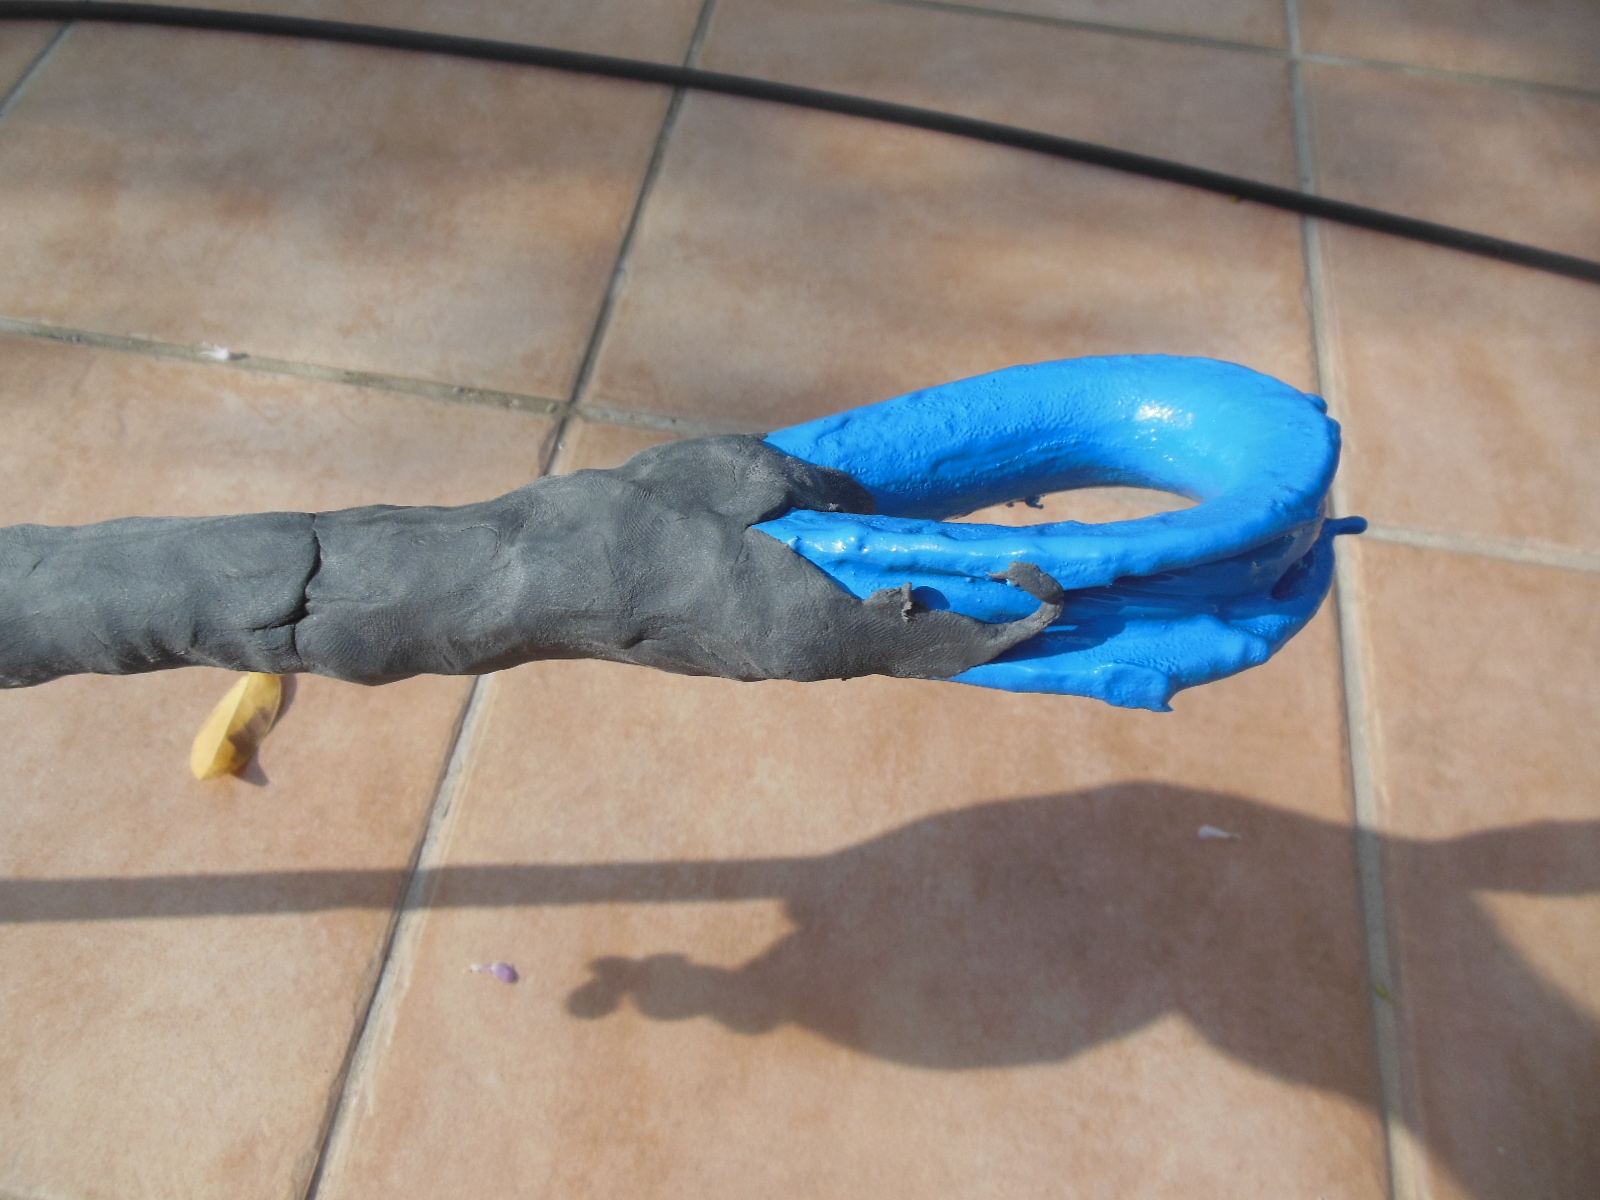
Middle wall guy big grip was disintegrated in the first 8 inches. Put on temp guy on 13 February. Removed guy today, cleaned all, and put on new big grip on Philly. EHS tail was opened for inspection and is perfect. Epoxy primer double coat put on today. Photo shows the Phillystran on left and rusty Phillystran on right beneath the disintegrated guy grip.
22 February 2016
Guy wire project complete, all tools and scab guy put away. Safety cables re-installed.
27-28 October 2016
Scraped and primed from first guy set to bottom. Found about six very bad areas in legs, all in the upwind side, with deep rust striations. Cleaned deep and knocked off metal with hammer and primed. 3.0 hours on tower. K8PGJ showed me how to take the brushes out of the Makita and cleaned them, and that stopped the repeated failures of the motor that I saw on the 27th.
2 November 2016
Scraped and primed from 50 foot point down to bottom guy anchor. There are several VERY bad areas of leg rust on the front of the back leg, very difficult to access and clean. Did the best I could and primed. In many places the cleaned zig zags are necked down to half their original diameter. This tower is clearly in its last year or two of safe service.
5 December 2016
Started just above mid guy anchor. All three legs, especially the upwind two ones, had severe rust blooms with vertical splits. I cleaned them all off and did not quite find holes, but the metal for a height of over a foot on each leg is brown and soft on the entire front. Need splints. Applied epoxy primer. Spotted here and there with primer down to 50 feet. Will continue tomorrow. 2.0 hours on tower. Used two Makita brushes entirely.
7 December 2016
Makita was dropped and failed permanently. I did from mid guy anchor down to 50 ft manually and put on primer coat. One very bad leg bloom on southeast leg at bottom of 60 foot section, but no hole.
12 December 2016
Put on white finish coat 70 ft down to 50 ft. Top third still remains for triage. 2.25 hours on tower.
23 February 2017
Did power brushing and primer paint from 15 boom down to where I stopped in December at 70 ft. Deterioration continues, but no really bad new spots. Still see the holes in the leg where the splint is. 2.25 hours on tower.
3 March 2017
Applied white finish coat to the above primed section. Withstood a driving wind and rain storm about halfway through the process. 1.75 hours on tower.
26 March 2017
Power brushed and primed from top plate down to 15 yagi where I left off on March 3. Condition was not as bad as some of the areas lower. Most places I did not deep clean but only took off the bulk of the rust and then primed. Objective is limited period of survival. 3.25 hours on tower.
29 March 2017
White finish from top plate down to 15 boom. This completes work on the Europe tower. There are no life-threatening problems on this portion of the tower. 2.5 hours on tower.
26 February 2018
Went up to 25 feet and did power scraping and epoxy priming of bad spots. Four very rusted-looking spots on the legs were not quite as bad as expected underneath. Also did aggressive maintenance on the legs at the base. Objective is emergency work to keep it in the air one more year. 1.5 hours total.
1 March 2018
White finish coat from 25 foot point to bottom on all primed spots from 26 Feb. 1.25 hours on tower.
4 March 2018
Power-brushed and primed 52 foot point down to 25 foot point. Many bad places including a broken zig zag above bottom guy bracket on Stone face. Also big grip is failing on bottom Stone guy. 3.0 very hard hours on tower. Nearly all above the 52 foot point is pretty good because it was done in March 2017.
5 March 2018
Finish paint white from 52 foot point down to 25 foot point. Ran out of paint about one zig zag short of completion. 1.5 hours on tower.
6 March 2018
Finished white paint at the 27 to 25 foot level. This completes all emergency work on Europe Tower.
October 2018
Beginning October 11, prepped all new sections with power sander and a vinegar wipedown. Then applied epoxy primer, epoxy white, and finally epoxy grey. Section 7 differed in that the "white" coat on the bottom 2/3 of the section was grey. Section painting, all coats, was completed on November 1.
9 November 2018
Final tensioned mid Stone guy with completely new deadend at tower and stainless in equalizer plate. Bottom Stone guy was similarly completed about two weeks ago. Assembly of new tower completed this date including rotor test.
11 November 2018
Back mid guy deadend replace at tower. This one was in pretty good condition, not near failure.
13 November 2018
Removed wall mid guy and discovered deadend was open at top and only two strands remained. Miraculously this did not fail. Reattached with new hardware on November 16.
17 November 2018
Removed bottom wall guy. Deadend was in pretty good condition. Replaced with new and stainless thimble.
4 December 2018
New tower erected. Bottom six guy deadends at tower are all new. Some covered and some left bare for close observation. Top three deadends were left from the old, as they were in good condition from their replacement with top guy bracket years back. That bracket, which was epoxy coated when installed, still looked good.
19 February 2019
Changed out galvanized rope clamps on Bencher overhead truss with new stainless. Old ones were brown and corroded already. Tower looks good top to bottom, heavy salt scum on all parts. Plumbed by eye and final-tightened all guys, then installed safety wires at guys. Gradually weatherproofing the ground connections.
27 February 2019
Finished waterproofing of all ground connections this date and primed the safety cables. Europe tower project complete.
5 December 2021
Painted white finish epoxy from top plate down to top guy anchor. All was in good condition with no rust noted. DX Engineering accessory plate turning brown near hardware. Finish coat is beginning to oxidize and go slightly flat in upwind sides. Paint project started as precaution to stop any breaks in the protection before they happen. 2.5 hours on tower.
7 December 2021
Finish paint (white) from above point down to just above 15 meter boom. 2.0 hours on tower.
9 December 2021
Finish white down to 71 foot level, just above Pacific tribander. 2.0 hours on tower.
24 February 2022
Finish white from 71 foot down to and including middle guy bracket. All in good condition. 2.0 hours on tower.
7 March 2022
Finish white coat from Pacific tribander down to 53 foot level. 2.0 hours on tower.
17 March 2022
Finish white coat from 53 ft level down to 44, just below South America tribander. 1.5 hours on tower.
18 March 2022
Finish white from SA tribander down to bottom guy bracket and most of the bracket itself. 2.0 hours on tower and a trip to the doctor.
24 March 2022
Finish white bottom guy anchor down to 22 feet. Intermittent heavy rain showers; 3.0 hours on tower.
1 April 2022
Switched to silver grey because paint factory has no white or any other color. Painted finish grey down to 9 foot point. 1.5 hours on tower.
3 April 2022
Silver grey from 9 feet to ground including base plate. 1.0 hours on tower. PAINTING COMPLETE.
7 February 2023
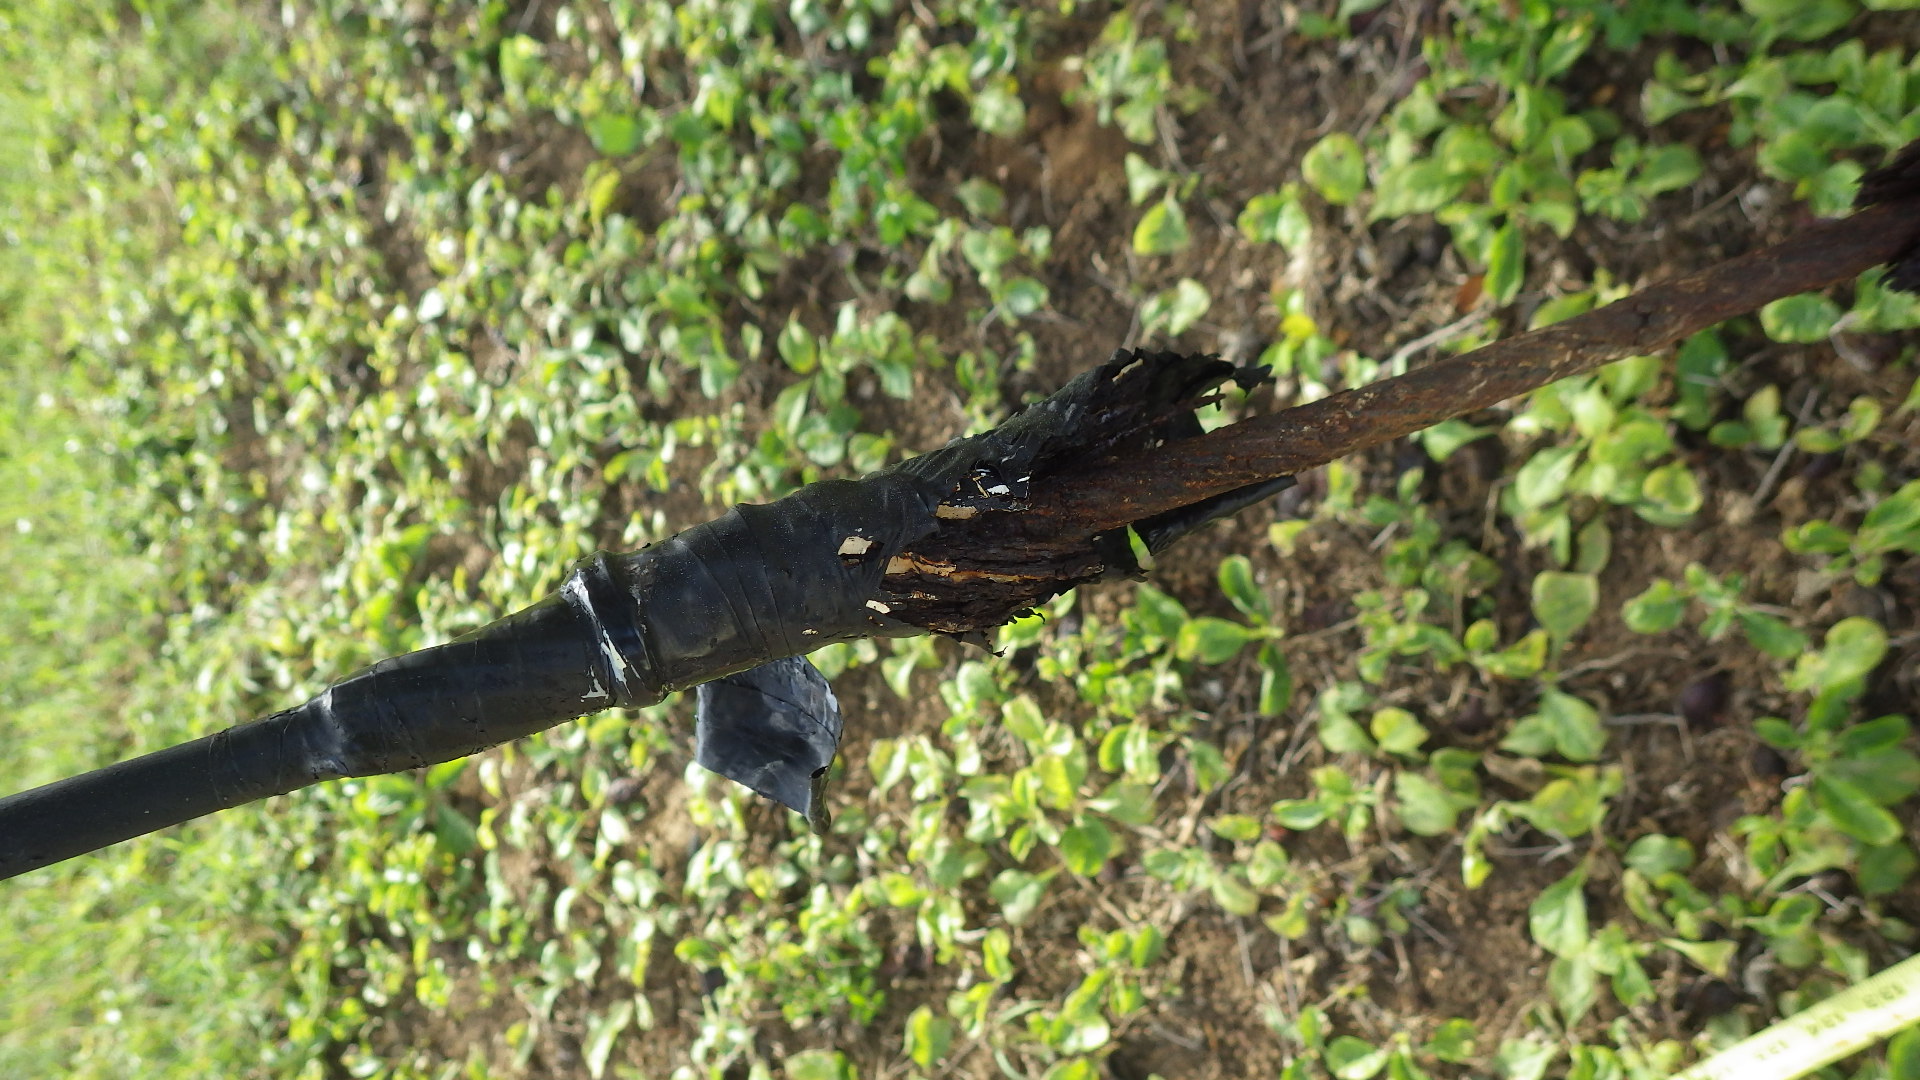
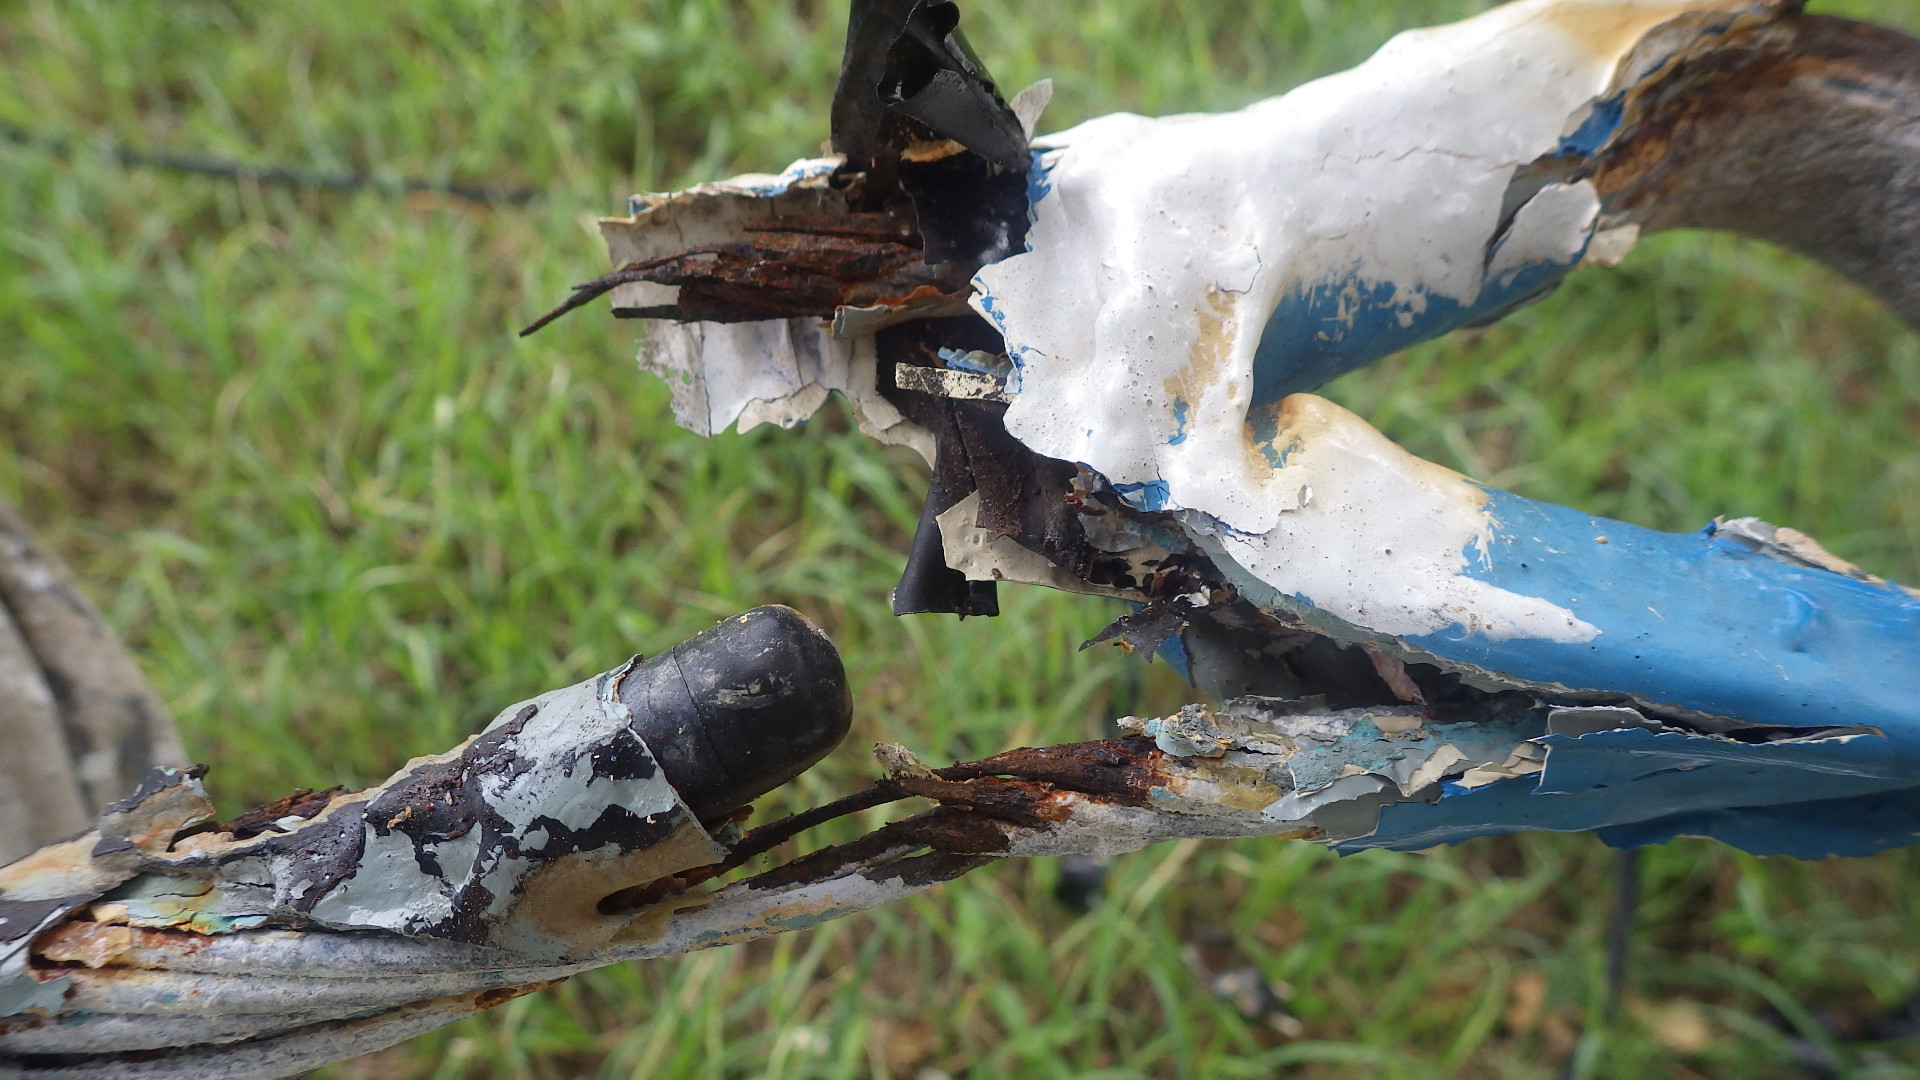
Middle Stone guy showing very bad rust bloom on bottom Philly deadend. Below photo by K8ND from ground with big lens. Connected and tensioned temp guy this date with Dorothy and KB7Q.
.JPG)
8 February 2023
Deadend turned out to be totally rusted at midpoint and broke off in my hand. Critical failure was possible. Zoom's brother Wengel came and cut out large portions of the offending tree branches. Installed new deadend and primed.
10 February 2023
Guy reinstalled and tensioned with new deadend in place. Potted insulator in putty and then taped triple. Wrapped deadend in coax seal and double layer of Scotch 33 as an experiment. Finished with new safety guy at bottom on 19 February 2023.
20 Feb 2023
Final coat white of safety guy at Stone guy anchor. Used leftover white epoxy from 35 ft guy anchor down two zigzags over worst part of rain damage to the underlying white.
22 November 2023
Full inspection. Very minor rust blooms on zig zags, one on a leg, and the Al mast is corroding around the circumference just below the lower thrust bearing. All else extremely good at 5 years. Bottom 20 (grey) still shiny and perfect. Rotor failed, locked up from very severe windstorm in early November. Needs to be replaced.
27 March 2024
Worked from top down cleaning minor rust spots and painting with white epoxy. Notable bad spots were zig zags facing the wind around the 15 and 10 meter booms. Not major, but a couple of spots were significant. Worst spot was on Stone leg at 62 feet, with about a 3 x 1/2 inch blister and some significant rust penetration into the leg. I hand cleaned with a utility knife and double coated with paint. Also applied white paint to all nine exposed parts of the deadends on the thimbles, and to the short parts that were left exposed as experiments. Also totally coated with white the bottom wall guy, that was left totally exposed as an experiment. It was showing zero rust at this time. Next step on this tower is that it needs the every three years coat of paint totally from top to bottom. 3.0 hours on tower
7 February 2025
New epoxy finish coat, silver grey, from top plate down to and including top guy bracket. No particular problems noted. 2.0 hours on tower.
10 February 2025
Checked deadends at top of tower. All three are encased in pliable duct seal, no indications of rust. Scraped rust from NE leg at about 64 feet. Appears to be very bad metallurgy in this area, with spots of differing colors. All rust was removed. Applied grey primer coat of Intergard, which was very viscous when it went on. 1.25 hours on tower.
21 February 2025
Painted grey AP Thane from guy anchor down to one zz below the bottom of top section. 2.25 hours on tower
22 February 2025
From 90 foot point ground off
all rust spots and primes with Molupon down to ground. About 30 small poke
throughs on zig zags. Only bad was at 60 foot point on Stone leg and at bottom
of that section on Well leg. 1.75 hours on tower
25 February 2025
Painted finish epoxy (grey) from above point down to 10 meter Europe Yard yagi. 2.25 hours on tower
8 March 2025
Painted finish epoxy (grey) from 10 yagi down to Pacific tribander bracket. 2.00 hours on tower. This was first use of the International Akzo-Nobel Intergard paint, which turns out to be very excellent.
9 March 2025
Painted grey finish epoxy from above point down to 59 ft. 1.75 hours on tower.
10 March 2025
Painted grey finish from 59 ft down to SA tribander. 1.75 hours on tower.
11 March 2025
Painted grey finish from SA tribander to bottom guy bracket. 2.00 hours on tower.
12 March 2025
Painted grey finish from bottom guy bracket to 20 foot point. 2.00 hours on tower. Painting complete because the bottom 20 feet (grey) is in like new condition except for some touch-up needed here and there.
15 March 2026
Dug up accessible guy anchors down to concrete. All look like new. Put on coats of epoxy primer and finish, let dry, and recovered with dirt.
27 March 2026
Spotted bad spots from rotor down to about 15 feet with grey Interthane epoxy. Only minor spots except at 61 ft on the NE leg that area of irregular metal is visible. It was still covered with the last coat, but I put fresh coat on the whole area, abour 30 inches vertically. Also there are spots from about the Eur 10 yagi down where the grey paint split open like the leg underneath had expanded and burst out the grey, exposing the white finish that is the next coat down. These are all the way to about the 15 foot point. I painted them all. 1.75 hours on tower.
28 March 2026
Coated with grey epoxy from about 23 feet down to 6 feet. This did not appear to have been properly coated with grey the last time. From 15 ft to about 6 feet the grey paint was crinkled and dry, and it soaked a lot of new grey today. From 6 feet to base plate is good and was not repainted. 1.75 hours on tower.